
Monday, 17 December 2012
Christmas Tag No. 7
Hmmm... It seems I get so many more ideas when I'm supposed to be doing other work, than when I'm not! But with me off on holiday on Saturday I went in to speedy crafter mode this weekend!
 I finally used up a piece of backing card that's been with my other snippets since last year, and I'd never had the chance to use it! Soooo.... I'm going to pop by the swings at the Playground :) Quite simply, I cut out the holly shapes from some plain green card and drew the line on with green pencil. I stuck them on with foam sticky pads. I found the three berries, sequins, and stuck them on top with some slightly taller sticky foam pads... Pretty simple really :)
Friday, 7 December 2012
Cafe de Paris
The theme this year is Socks in the City... which probably doesn't mean anything to you, so let me explain. For a good ten years now, we've gone to France with the family, a total of 11 of us to begin with, with additions along the way, and now we've grown to 15! As there's little space in the car we decided to buy themed presents, so everyone buys everyone else a present to do with their theme. This has ranged from, all 10 presents having to fit in a shoebox (which was decorated), each present fitting in an envelope, colours, numbers, having to fit it in a buttertub and star signs. This year, each present has to fit inside a sock, as well as having something to do with a city, mine is Monte Carlo.
Now I've got the explanation out the way, can show you this:
.JPG)
.JPG)
Now I've got the explanation out the way, can show you this:
.JPG)
.JPG)
This is going to hold the voucher for one of the presents, with the gap in the middle showing the voucher. I used colour pencils for the sign and then used glitter for the writing. Quite simple really! But at least now you can start thinking about the difficulties I've been having with my shopping.... how many female presents can you think of that fit in a sock and relate to Monte Carlo?! :)
Christmas Tag No. 6
OK, so I'm now halfway through the tags at least! Well, now the exams have finished I can do those in the next couple of weeks (hopefully!). And I'm going to pop to the Playground with this, show the girls what I've made :)
.JPG)
.JPG)
I used up some a Christmas paper that my sister bought me last year, I have a problem where I don't want to use them because they're so nice! I found a word that was in two places, which was the dotted Christmas, and cut the front rectangle so the top had about half of it on there. I then made pouch out of thin white card and stuck that to the back. For the insert, I cut a 'T' shape, making sure that the Christmas was going to align with the bottom. I then stuck some plain white card over that, for me to write on. The insert then slots in to the pouch on the back of the first rectangle. I also added the ribbon, which I stuck on with double sided tape.
(Please check out some of the other Christmas tags I've made, whilst you're here!)
.JPG)
.JPG)
I used up some a Christmas paper that my sister bought me last year, I have a problem where I don't want to use them because they're so nice! I found a word that was in two places, which was the dotted Christmas, and cut the front rectangle so the top had about half of it on there. I then made pouch out of thin white card and stuck that to the back. For the insert, I cut a 'T' shape, making sure that the Christmas was going to align with the bottom. I then stuck some plain white card over that, for me to write on. The insert then slots in to the pouch on the back of the first rectangle. I also added the ribbon, which I stuck on with double sided tape.
(Please check out some of the other Christmas tags I've made, whilst you're here!)
Christmas Tag No. 5
I popped to St. Neots on the weekend and found some really nice wrapping paper with baubles on. I thought I could wrap my Mum's present with it, and then realised it would look much nice as a tag :D - Maybe I'll do both!
.JPG)
.JPG)
So I stuck the wrapping paper on another piece of card to make it stronger and cut out the tag shape. I then, quite simply, cut out the Christmas tree bauble from another section of the paper and used foam sticky fixers to raise it up from the card. So simple, yet I loved the paper and HAD to use it :)
Christmas Tag No. 4
I don't think I've made so many cads in such a short space of time before, but after my brainwave earlier on this week, what else could I do?!
 I cut out a Christmas Tree shape from some green card. I then attacked some green paper with my Christmas Tree hole punch (I don't know if you can even see that, my camera was playing up today!). I used PVA glue, and as I would with glitter, sprinkled the tree cutouts on top. I then added the brown ones for the pot at the bottom. I found a gold star on the floor (?!) and stuck it on top. I then added some dots of gold glitter glue for the baubles. Finally stuck this to a rectangular piece of card and cut the edges with my corner punch and embosser.

Monday, 3 December 2012
Christmas Tag No. 3
When...Santa got stuck up the chimney, he began to shout...!
Half a day of school canceled because of the heating not working? Ooh, yes please! I took the opportunity to come up with this, after my brainwave of ideas in the middle of my French exam this morning :)
I used a 10 x 8cm card with curved corners. I did the chimney bricks with some orange pieces of paper, leaving some gaps in between. You can't see it very well because my phone camera's a bit pants, but I coloured the snow with light blue and grey pencils, before going round the edge with a thin line of glitter. I also coloured in Santa's legs with pencil. The fur on the top of his boots is some handmade paper with bits of glitter in and the boots are done with some patterned embossed black paper.
Sunday, 2 December 2012
Birthday Butterflies
I know, I should be revising now but I just couldn't help finishing this card to take a break from the Endo- and Exothermic reactions I'd been studying for the last hour!
It's my cousin's birthday next week and I know she loves everything from Cath Kidston to buttons, so I thought the beads and butterflies on this would be perfect :)
 I used a rectangle card, 12.2 x 17.8 cm, and cut 6 circles out, which were all 4.6 cm in diameter. I then glued brown paper behind this and then plain card behind that, so from the inside it looked seamless! I then dug through my snippets and found some small pieces of card that were similar shade dotted. I cut out some butterfly shapes and glued only the body of the butterfly to the card. Finally I stuck beads along the body to give a 3D effect and folded up the wings.
Back to revision then... but I have a quick swing at The Playground on my way! :)
It's my cousin's birthday next week and I know she loves everything from Cath Kidston to buttons, so I thought the beads and butterflies on this would be perfect :)

Back to revision then... but I have a quick swing at The Playground on my way! :)
Sunday, 25 November 2012
Christmas Tag No. 2
It's starting to get very busy with exams, but I managed to quickly photograph this one and upload it between revision and family visits!


I used a plain triangle of off white card, and then rumaged through my snippets and found some patterned red and green papers from last Christmas (which means a quick trip to the playground!). I cut them into some quirky shapes, stuck them on and added a glittered star to top it off!
Sean's Birthday 2012
Among all the Christmas cards, there's also quite a few birthdays this time of year, which I find very hard to make once I'm in the Christmas mood!
 I haven't got so much time this year, so it's not quite to the scale of the card I made last year but there we go!
I used a blank card and coated it wit yellow paper, and then put a square of black card over the top. I cut the beer glass shape from plain white card, and stuck yellow rectangles on top of that. I then cut some different sized circles from the white card and coloured in the edges with felt tips, before gluing them on top to finish!

I used a blank card and coated it wit yellow paper, and then put a square of black card over the top. I cut the beer glass shape from plain white card, and stuck yellow rectangles on top of that. I then cut some different sized circles from the white card and coloured in the edges with felt tips, before gluing them on top to finish!
Monday, 19 November 2012
Christmas Tag No.1
This Christmas, I've decided to make tags, rather than just cards, and this is the first one...
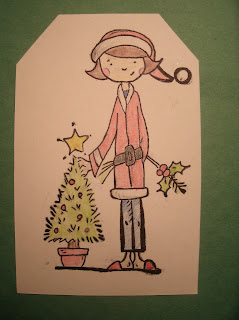 Using the stamps that came with my Creativity magazine a little while back, I simple stamped the image onto a piece of card, then used pencil to colour it in, before cutting out the tag shape. Very simple, but I've got so much to do and so little time before Christmas that I thought it wouldn't matter! :)

Thursday, 15 November 2012
Christmas Tree O Christmas Tree!
I was having a little search on Google to find some ideas for Christmas cards, and came across this website, with a lovely book tree!


So I found one of my Dad's books that he didn't like because the ending was rubbish, and followed the simple instructions on how to make it! So I sliced out a thirty page section of the book, and fold each page into a triangle shape, whilst still glued at the spine. I didn't cut the corner off but you can if you wish. I then repeated this with another set of thirty pages and used some strong double sided tape that I had to hand to stick the two halves together. Finally (which you can't really see!) I used silver paint to go over the edges of the pages, so it now glitters a bit, and made a small cylinder out of silver card to stand it on. A really simple bit of origami to make a lovely little decoration :)
Wednesday, 14 November 2012
Wedding Card
My Grandma's off to a wedding on the weekend, and asked me to whip up a card for her to give, as she found it difficult to find a nice one in the shops. So here's what I came up with:
 It took a little over forever to make this one, especially when I found out my gold pen had turned bright orange! I found a website selling photoframes that looked like this, and it gave me the inspiration, and since I don't know the couple, the invitation was all I had to go on! I cut the shapes of the rose out of the white square card, and cut the square out of the middle. I then used up some nice purple snippets (I'm putting on my coat and heading off to the Playground as we speak) and stuck them behind the cut outs to show them through the spaces - which took an unbelievable amount of time! I finished it off with a brand new gold pen, putting a thin border round the edge, drawing the stems and writing in the middle.
Although it took so long, I was pretty proud of the outcome, let's hope the bride and groom like it too :)

Although it took so long, I was pretty proud of the outcome, let's hope the bride and groom like it too :)
Sunday, 11 November 2012
G'ma's Birthday 2012
Summer feels like such a long time ago now, but I haven't been organised enough to post for a while. I made this one in July for my Grandma's birthday, because she's always in the garden!

Lots of quite simple parts that added up to make a card my Grandma loved :)
Thursday, 1 November 2012
My name's Carys Langsdale and I make handmade greetings cards for all occasions.
 I'm only 15 years old, and started off with very simple cards, but I've made many creations since then. I love doing crafts between school work and playing music, and would love to spread my designs to others. Please take a look through My Portfolio and don't hesitate to contact me.
 After mainly making cards for my family and friends, I've decided to reach out and spread my creations. I'm happy to make new things, such as framed pictures or handmade gifts, but I prefer to make them specifically for one person and to make it personal to them.
Tuesday, 14 August 2012
See you soon :)
So that was a few posts to keep you updated on what I'm making, there's a couple more things that I need to take photos of before I upload them, but that will have to wait... I'm off on holiday on Thursday.. Monte Carlo, Tuscany and then onto Roma, all in two weeks... Ciao Ciao :) x
Sonny's Christening Present
As well as a card, I made some of Sonny's Christening present too, and I will tell you now, it was not painless!


I bought the frame and lots of blue buttons, though it could be in any colour really. I printed off an 'S' shape and arranged the buttons in a random order in that shape. We then realised that PVA glue may not hold the buttons to the card for very long, and the only other thing we had to hand was a hot glue gun... so that's what we used. I managed to burn my fingers several times, especially when the glue came through the holes in the buttons, and spent AGES getting all the stringy glue bits off, but it was worth it, and the frame looked lovely :)
Sonny's Christening Card
So you may have seen the Wardrobe Card that I made back in January for my newborn 2nd cousin, well it was recently Sonny's Christening and this is the card I made...
 It was a bit of simple painting for this one.. I made the template on the computer and printed it off. This meant I could cut out some parts and use it to stop and paint issues. I sponged the red bus shape on to the card, and used a paint brush and grey paint for the stairs, the driver and his name. I also found some big brown buttons and stuck them on the front... I did want to make the buttons go round but I was running out of time and didn't manage to think of a simple way for that to work, but oh well, his parents LOVED it :)

Father's Day 2012
It's been too long, I know! There's even been cards that I've forgotten to photograph and had to ring people up and ask them to send me some pictures! I must sort it out!
A card that I made a long time ago now, was for Father's Day...

A card that I made a long time ago now, was for Father's Day...

So it was another simple card to make, I just cut the card so that the front had the collar on it, I made that by just folding it down. I didn't have any striped paper, so printed dark blue stripes on to some plain light blue paper. I stuck an extra bit of striped paper down the front to give it more of a shirt style look. I used the left over white card and stuck it to another piece of striped paper for the pocket, and stuck buttons down the front. Before sticking the pieces of paper on, I folded down the edges slightly to make it more realistic.
Quite simple really :)
Quite simple really :)
Wednesday, 27 June 2012
Brioni's Birthday
My third 'catch-up' post for today!
I have to say, this could be one of my top cards this year :) It was my sister's birthday this June, and obviously she expects the best of my cards, so I put a lot of effort in, I think it paid off!
.JPG)
Hmm... Not sure how much good the photo gives it, but I'm sure you can believe me! So I used a cream card with the cake stand being gold paper. I used up loads of checked paper I had lying around, so I think this may qualify for The Playground (I know, it's been WAY too long!). I did the cakes with plain paper, so that it fits more-or-less with the cupcake case (ie not just a small dome, more of a dome with a bit sticking out the bottom! I then cut out the cases and stuck them on top, and then arranged them on the cake stand. I added a small dot of plain glitter-glue on the top of each... the cherry on the cake :)
So it seems quite simple writing it down now, but I assure you, it took TOO long!
Raveena's Birthday
Card number 2 for today then!
OK, I'm sensing that I could get in trouble a little for this one, as the dress obviously wasn't my creation, but Lucy Cromwell's Papermania range. But the problem was that I didn't have very much time for this one, and nor did I have very much cash, especially as I'm saving up for a sneaky little trip to Rome this summer with my sister, brother and cousin! So, instead I made something that looked a lot like Lucy's creation!

OK, I'm sensing that I could get in trouble a little for this one, as the dress obviously wasn't my creation, but Lucy Cromwell's Papermania range. But the problem was that I didn't have very much time for this one, and nor did I have very much cash, especially as I'm saving up for a sneaky little trip to Rome this summer with my sister, brother and cousin! So, instead I made something that looked a lot like Lucy's creation!

So I used a plain, light pink card, with a darker pink piece on top, I did the border with 0.5cm width strips of silver card, with a little jewel at each corner. To make the dress, I got myself a wallpaper sample and photocopied it so it wasn't so hard to fold, and used the sections with pattern on them. I cut out the pleats slightly bigger, so I could fold over the edges to make it look more like one piece of paper folded up, and just stuck a small, light pink ribbon around the waist!
Thank You Card
Revision and exams seem to be taking over my life at the moment, and although I've found time to still make a few, I haven't been up to scratch on posting about my cards recently! I think I should get myself up-to-date otherwise I'll never post them!
This one's a very simple one, and to be quite honest I wasn't greatly pleased with it, but my Mum said it was lovely(?!)

This one's a very simple one, and to be quite honest I wasn't greatly pleased with it, but my Mum said it was lovely(?!)

A few weeks back I went on a weekend trip to Denmark, just me and my parents, leaving early Saturday and coming back on the Monday morning (just in time for school! :/ ). We were staying with friends of ours and I've never been to Denmark before, but I would recommend it, it is very lovely, and very quiet!
I thought I'd make a nice Jubilee themed card and used some papers that came with my Creativity magazine! I think the card is pretty self-explanatory... I cut out 8 triangles from the papers and stuck them onto the card, joining it up with some red ribbon, simple!
I thought I'd make a nice Jubilee themed card and used some papers that came with my Creativity magazine! I think the card is pretty self-explanatory... I cut out 8 triangles from the papers and stuck them onto the card, joining it up with some red ribbon, simple!
Monday, 23 April 2012
Josh's 18th Birthday
Here's my second post for today...
And it's going into Di's Snippet Challenge, because I managed to use some papers that I could never seem to find a way to use up :)
I've always had trouble finding ideas for males, and I have to say that my Mum came up with the idea for this one!
 So my cousin, Josh, is very into his music, and is a very good music journalist, and I thought I should make a special card for his 18th this weekend! And I also managed to use up some of my plain bits of paper, and quite a bit of gold string!
The card was plain white - 26 x 10cm - And I did a guitar shaped 8 and a guitar neck shaped 1. the 8 was just plain blue, thick paper and the 1 was plain red. I stuck black pieces of card under the holes in the guitar body.I cut the head out of plain brown paper too. I used 6 gold strings and stuck small pieces of card over the top of the ends to neaten it up a little.
And it's going into Di's Snippet Challenge, because I managed to use some papers that I could never seem to find a way to use up :)
I've always had trouble finding ideas for males, and I have to say that my Mum came up with the idea for this one!

The card was plain white - 26 x 10cm - And I did a guitar shaped 8 and a guitar neck shaped 1. the 8 was just plain blue, thick paper and the 1 was plain red. I stuck black pieces of card under the holes in the guitar body.I cut the head out of plain brown paper too. I used 6 gold strings and stuck small pieces of card over the top of the ends to neaten it up a little.
Mum's Birthday 2012
Grr.. I've done it again, and not posted in over a month! I apologise, and therefore I am going to post twice today!
My first card is one that I did a little while ago, for my Mum's Birthday.
 I used a plain white 7 x 14 cm card for this one. I found two pieces of 6.5 x 6.5 acetate and sponged orange and pink watercolour paints in the flower shape on to them. I stuck the middle of the orange one straight on to the card, then stuck the pink one on top with a foam pad. I then found a 'pearl' cabochon and stuck that on top. I used watercolours to paint the stem and leaves.
It was quite a simple card really, but my mum loved it :) I found he acetate just lying around, and my G'ma had the Cabochon, so it was easy to find the 'ingredients' too :)
My first card is one that I did a little while ago, for my Mum's Birthday.

It was quite a simple card really, but my mum loved it :) I found he acetate just lying around, and my G'ma had the Cabochon, so it was easy to find the 'ingredients' too :)
Wednesday, 21 March 2012
Mother's Day 2012
I'm sorry for being such a stranger and not uploading in a whole month, but I've been busy with school work and exams :/ At least I've finally got round to uploading the Mother's Day card I made for my mum this year!
 I used a 13.5cm X 13.5 cm plain cream card, with a baby pink paper stuck on top. I used the no. 37 lacé to make the tulips. I've never done a lacé before, and although the card was very simple, I spent so long just looking at it, scared to make a start that it took me ages!
Again, I am very sorry for disappearing for so long, and I promise I will be posting again very soon :)

Again, I am very sorry for disappearing for so long, and I promise I will be posting again very soon :)
Monday, 20 February 2012
Henna's Birthday - February 2012
I had a brainstorming session to help me come up with the idea, with thoughts from good looking men to chocolate to food in general. I decided to go with food and thought the appropriate food would be cake, soGoogled around a bit to try and find myself an idea or two, and I came up with this:

I just used a plain, cream, 13.5x13.5 card, and used plain white card for the actual cake, with two pieces for the fancy bits around the top. The hearts on the bottom layer are just coloured in using a mixture of red pencils, and then I did the outline to them in gold pen. I didn't have any nice red hearts amongst my bits and bobs, so I had to settle with some random purple hearts, and I used PVA glue to coat them with glitter. The candles are done with a dark red paint, with thin lines of red glitter to give them some shape, and the candle flames are done with one of my favourite crafty things of all time, my glitter glue pens! I don't think they're even called that, I think they are called 3D paints or something, and I got my first set AGES ago for Christmas probably when I was about 8 or 9! Unfortunately, my set dried up, remember I was only young when I got them, and I've been searching for some more for ages, and the only ones you can find are aimed at young children, but they are amazing and really bring the cards to life!
Sunday, 12 February 2012
Valentine's Day No. 2
I've had lots of people coming to see my blog this week, with special thanks to Di, who's helped venture out in to the blog world via the use of the Snippets Playground! It seems that most of the people who have popped in have made comments about my wardrobe cards, which, if they where MUCH more simple to make, I would continue making them, but I may have to leave it for a while!
Anyway, back to this post, after doing bits of this card all week, but never actually putting in the effort to finish it, I decided I should sort that out this afternoon. So, after watching the rugby, and then calming down a bit after Wales won, I headed upstairs to finish this one off and photograph it.


Anyway, back to this post, after doing bits of this card all week, but never actually putting in the effort to finish it, I decided I should sort that out this afternoon. So, after watching the rugby, and then calming down a bit after Wales won, I headed upstairs to finish this one off and photograph it.

Unfortunately, I can't take all the credit for this one, as I did use an idea from a very handy little book that I got this Christmas called 'The Ultimate Cardmaker' and the card was called Heart of Gold. I used an edge cutter on a white card, with the same metallic gold card as the hearts are, behind it. I then just used a plain white/see through ribbon, tied it at the top and let one end fall down. I threaded on the 3 beads and put a tiny bit of PVA glue on the last bead just to make sure it didn't fall off, although they were quite tightly put on there. The othere end of the ribbon I cut short and stuck it on the inside of the card with a bit of double sided tape.
I then made an envelope using plain white thin card, rounded off the edges, and then used the same edge cutter on the envelope and stuck a bit more metallic card behind.

It was quite a simple card to make, but, as with a lot of the cards I make, I got towards the end and was scared to go on in case I ruined what I'd already done! We'll see what the reactions to the cards are on Tuesday :)
Friday, 10 February 2012
Liebster Blog Award
Wow! I've not been on here long, and I've been given an award!! Thank you so much Andria at Iona-Rose, it means a lot for you to help me get out into the 'world of blogging'! :)
My only problem being, is that as I am so new at the moment, I haven't yet found 5 followers :| SO... I guess I will have to wait! But, I will at some stage find 5 people who inspire me and will be sure to pass on the award :)
My only problem being, is that as I am so new at the moment, I haven't yet found 5 followers :| SO... I guess I will have to wait! But, I will at some stage find 5 people who inspire me and will be sure to pass on the award :)
Thursday, 9 February 2012
Pixie's Crafty Snippets - Challenge Number 6 - VALENTINES DAY
With Valentine's day coming up, and orders coming in from my Mum and Dad (yes, they want me to make the cards to give to each other!) I thought I should start making them now, and then I wouldn't have to stay up late the night before to get them finished! I was also encouraged by Di to give the Snippets Playground a go, so I thought I should combine the two!!


I got together all the bits of exciting red paper and card that I could find, and I also stamped some plain pieces of paper (the hearts on gold, and the black Winnie the Poohs on red) because although I thought I had a lot of different papers in red, it seems I may have 'over-exaggerated' my thinking!!
I then cut out the heart shape from my main card using my new craft knife :) I cut down all my 'snippets' to size and wove them (once they decided they would behave!!) I stuck another piece of the same card behind the snippets to make the inside look more professional. I used double sided tape to stick the thin gold ribbon to the top and bottom!
Once the papers decided to behave themselves it was quite an easy card to make, although it still took a couple of hours! I think I'm going to give this one to my Mum, so she can give it to my Dad (if that makes sense!) because it seems more masculine than the other card I had in mind (Which I will post up once I've finished!)
Once the papers decided to behave themselves it was quite an easy card to make, although it still took a couple of hours! I think I'm going to give this one to my Mum, so she can give it to my Dad (if that makes sense!) because it seems more masculine than the other card I had in mind (Which I will post up once I've finished!)
Friday, 3 February 2012
Sonny - January 2012
So my last upload was of Sean's birthday card. This January my cousin and him had a baby boy called Sonny and this is the card I made to 'welcome him to the world'!
 I decided to make him a card similar to the one I'd made for his Dad's Birthday, I used a baby grow and I little T-Shirt instead of the jumper and trousers, And then I did some toys that a young child would have too. I also did a large teddy instead of the golf clubs. The baby grow, T-Shirt and teddy were all raised again and yes, those are mini coat hangers that the clothes are on just as some extra detail!!
 There's a close up of the teddy bear, and you can see I just used normal coloured pencils and did the outlines in a darker brown.
I loved making this card because of all the little parts, so cute! But, again, it took so long! It got quite tedious towards the end but I was so proud of it when I'd finished, and the little boys parents loved it too! The hard work paid off again then!


I loved making this card because of all the little parts, so cute! But, again, it took so long! It got quite tedious towards the end but I was so proud of it when I'd finished, and the little boys parents loved it too! The hard work paid off again then!
Thursday, 2 February 2012
Sean's Birthday - December 2011
I made this one towards the end of last year, but I have to say I am unbelievably proud of it! I made it for my cousin, Sean who turned 41, and he loves lots of sports.

I think this card took me a solid 4 hours, and it got quite tedious towards the end but the end product was SO lovely that it was utterly worth while! The next post is another one I'm incredibly proud of, and it's very very similar too!
It's all done with coloured pencils, and, other than the books, all the little bits are done on other card and stuck on. The jumper, trousers, tennis ball, golf clubs and cricket bat are stuck on with some VERY useful foam pads, which are about 0.5cm x 0.5cm, and are sticky on both sides to give a raised look. The doors folded shut to reveal a HAPPY BIRTHDAY on the doors. But, by far my favourite part of this card, were the little coat hangers! I got some ordinary electricians wire (From my Dad!) and stripped it back, or you could use soldering wire or if there is actually crafting wire?! But any way! And I made a small triangle, with the two ends continued on quite far, bent one of the ends straight upwards, and twisted the other one around it. I then bent the top round and cut off the extra bits!

I think this card took me a solid 4 hours, and it got quite tedious towards the end but the end product was SO lovely that it was utterly worth while! The next post is another one I'm incredibly proud of, and it's very very similar too!
Christmas Cards

This is a photo of one of my favourites, I gave it to my Grandma!
It was quite a simple make, I drew out the shape, spread PVA glue over the reindeer (mainly in small sections it didn't dry too fast!) and heavily sprinkled the gold glitter over the top. I left a gap where the nose needed to go, and used red glitter for that bit instead. The eyes were only done with pen, but I couldn't find anything to make small eyes, and I just used a small, plain white ribbon and tied it in a bow for round the neck. The card measured 12.5cm x 12.5cm.
Subscribe to:
Posts (Atom)